
**The steps below to create the background image may be followed by anyone, however, if you are using a blogging site other than blogger you will have to upload your image to an image hosting site and then use a tiled background code in your sites html.**
STEP 1
Open up Photoshop and create a document 1980x300 pixels at a resolution of 72 pixels per inch. I find that an image 1980 pixels wide or larger ensures that it fits on all computer screens. Having the image be 72 pixels per inch also helps keep the file size down and is all you need for online viewing.

STEP 2
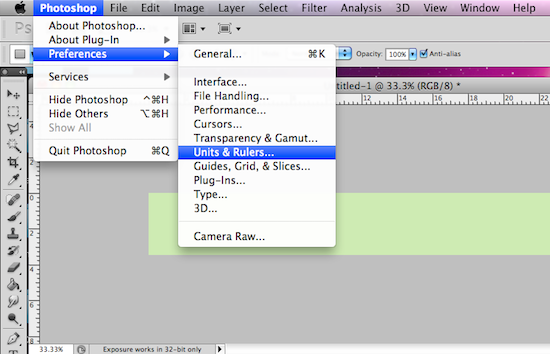
Fill the rectangle with whatever colored background you would like. I chose a mint green. Once you have filled the background please make sure that your rulers are set in pixels by selecting - Photoshop > Preferences > Units & Rulers > Pixels > OK.

STEP 3
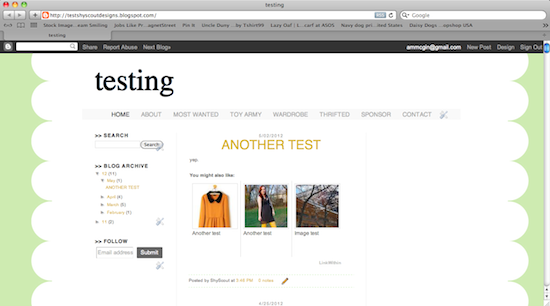
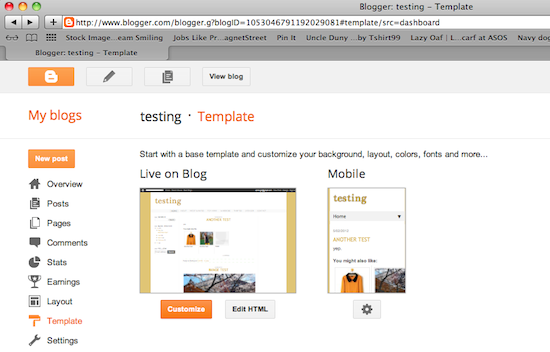
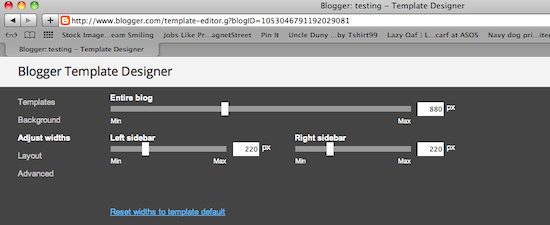
Next we need to figure out what the width of your blog is. If you do not know please go to your blogger homepage > Template > Customize > Adjust Widths > and view. My tester blog is set at 880 pixels so I want to make sure that whatever my inner background is it is at least that width or larger.
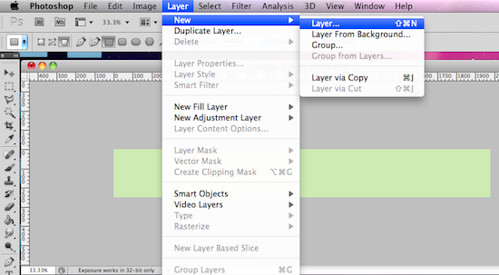
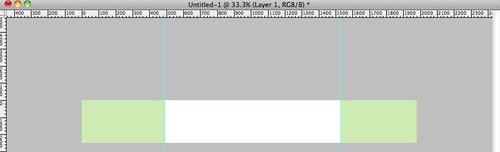
STEP 4
First create a new layer - Layer > New > Layer. In the new layer proceed to create a rectangle (this is the background for your text) larger than your blogs width (in this case my blogs width was 880 pixels ^). I chose to make mine a bit larger by making the inner background 1040 pixels wide. Once you have measured and created the rectangle center the box within the 1980 pixel space.

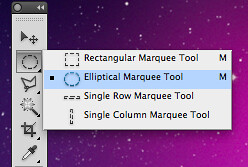
STEP 5
Once you have the inner background centered it is time to add the fun border. For this tutorial I added a scalloped edge. To do this first be sure to create a new layer. Once you have made a new layer create a circle with the elliptical marquee tool - be sure to hold down the shift key to ensure you create a perfect circle.
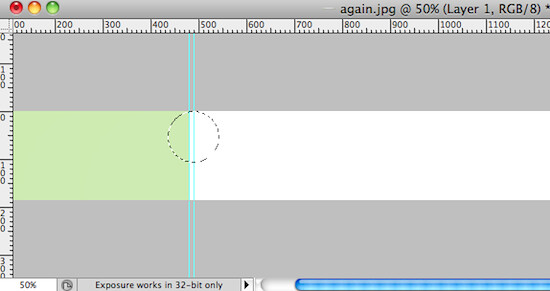
STEP 6
Fill in the circle with the color of your inner background. Once finished copy this filled in circle layer.
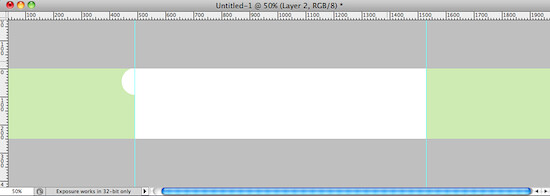
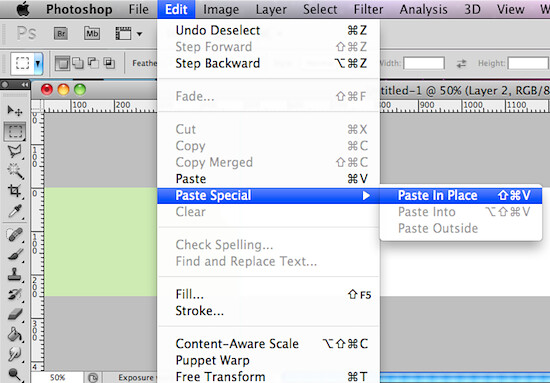
STEP 7 Once you have copied the circle layer proceed to paste the circle in place - Edit > Paste Special > Paste In Place. Drag the pasted circle below the other to create the scalloped edge. From here copy and paste in place the two circles and drag them to the opposite side of the inner background. Crop the image to the sides of the circles, or enlarge the circles to fit the space as shown below.

STEP 8
We are in the home stretch! Save this file as a .jpg.
STEP 9
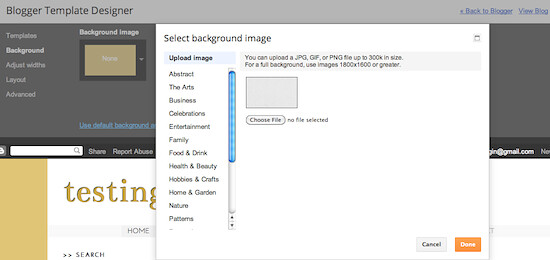
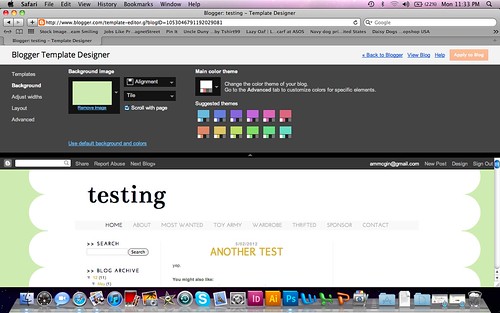
Now head back to the to the template page of your blog and re-enter the customize section. From there select Background > Upload image > Upload your newly designed background image.
STEP 10
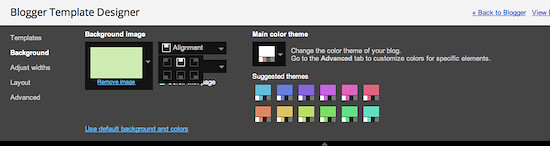
Once you have uploaded your image click on alignment next to your file. Select centered alignment and tile image - this will center and repeat your background.
VIOLA!! You did it :] You may or may not have to play around with the image or the widths of your blog to ensure that it is perfect, but at least now you have the tools and are well on your way. Have fun!
Teaching this stuff via the web is a lot more difficult and time consuming than I had anticipated. I never really think out the steps, I just do them. If this tutorial is difficult to follow, or if you have questions please let me know! Also, please let me know of any other blog design questions you would like answered and I will do my very best to answer them for you in an upcoming post :]
Have a great day everyone!!


These tutorials are so cool! What an amazing idea. Love the little scalloped background, I use GIMP instead of photoshop but a lot of things are really similar so I could possibly figure this out. If I have any other design questions I will for sure throw them your way, thanks so much!
ReplyDeletex Hannah
Thank you :] Oh nice! I have never used GIMP so I apologize if things don't completely line up, but I think that it would be pretty similar. Sounds good!
DeleteThanks for the tips! I am still trying to get the hang of blog designing. Hope all is well.
ReplyDeleteOf course! Thank you :]
Deleteyour tutorials are amazing! i would have done this completely different - but i dont use any of the blogger tools because im still technically on the old blogger code and it doesn't work with my blog. i just hand code it all because i like control anyway, but this is just a great way to inspire people who dont want to dig into all the css to get into designing!
ReplyDeleteThank you! Yeah, I hadn't used blogger tools until recently. They do help speed up the process, but I till love the coding too. Thanks. I thought using the blogging tools would be the easiest for those just starting out :]
DeleteI've been wanting to know how to do this so bad!!! It would look so pretty on my blog! I need to buy CS6! I want to learn as much as possible about blog design and these tips are wonderful! Keep them coming!
ReplyDelete:] Yay! I am so glad that you found this useful. I will get to work on some more. Dang. I just bought cs5 last fall before I left school for the discount. It is so tough to stay on top of the technology!!
DeleteThanks so much! I have been wanting to know how to do this! Now I'm going to have to play around with the blog a bit more! :D
ReplyDelete:] I am glad I could help.
DeleteI've been thinking about possibly adding a border to my blog so this tutorial is like magical! Totally bookmarking! Thanks Allison!!
ReplyDeleteRowena @ rolala loves
Wahoo! I am so glad. I hope it helps ya out in the future.
DeleteThis is awesome! I've been trying to figure this out for ages!
ReplyDelete:] Thanks. Glad I could help!
DeleteThis looks so cute, I'd never even thought about it before but that it such a cute idea!
ReplyDeleteCharlotte
:] Thanks.
DeleteThank you so much, I have just used your instructions to make a border for my blog! (I used Gimp not photoshop, and it went fine, but uploading it the right width for blogger was a bit of a nightmare). Love this series, keep it up!
ReplyDeleteThat is the cutest scalloped edge background ever! You are SO talented. I can't even keep up with it! hehe
ReplyDeleteI don't have Photoshop but I need scalloped edges! Please help! xoxo
ReplyDeletethank you soooooo much for this tutorial :) i've followed other tutorials before but its never worked out but this worked perfectly. I used GIMP and it was easy to figure out on there using your instructions for photoshop. thank you thank you thank you!!
ReplyDeleteThankyou so much for the great tutorial! <3 It's so easy to understand and the details are great! Thanks once again :))
ReplyDeleteOMG OMG ! THANKS A LOT FOR THIS TUTORIAL !! :'D
ReplyDeleteشات
ReplyDeleteصوتي
شات
شات
غلا
شات صوتي
غلا
غلا
الصوتي
غلا
غلا
الصوتي
غلا
انحراف كام
غلا
الروح
شات صوتي مغربي
الروح
الروح
عرب كول
الروح
صوتي
شات غلا
الغلا
شات صوتي الغلا
شات صوتي
صوتي
صوتي
دارك كوميت
Dark-comet 5.3.1
برنامج دارك كومت
شرح DarkComet-Rat 5.3.1 Arabic
Great and that i have a neat provide: home depot kitchen renovation cost
ReplyDelete
ReplyDeleteCreating a cute bordered background in Photoshop is a fun way to personalize your blog! Design your border, save it as an image, and for Blogger, upload it directly through the platform. If using another site, host the image and use tiled background HTML code.
For added creativity, consider using
Vn Editor Apk to create a video tutorial showcasing your design process or to complement your blog with engaging visuals.
In the competitive world of digital photography, image quality plays a vital role in attracting clients and building a strong professional reputation. Photo Retouching India is a trusted photo editing service provider offering high-quality Photoshop and Lightroom services for photographers and studio owners worldwide. With a team of experienced editors and a focus on precision, Photo Retouching India helps professionals deliver visually stunning images without spending countless hours on post-production.
ReplyDeleteSports photography demands sharp focus, vibrant colors, and dynamic impact. Photo Retouching India provides specialized Sports Photo Editing Services that enhance motion, clarity, and action. Editors correct lighting issues, enhance sharpness, remove distractions, and adjust colors to reflect the intensity of the moment. This service is perfect for sports photographers, media agencies, and event organizers looking for powerful and professional-quality sports images.
Clean and distraction-free backgrounds are essential for portraits, product photos, and commercial images. Photo Retouching India offers precise Photo Background Removal Services using manual Photoshop techniques. Whether it’s creating a transparent background or replacing it with a solid or custom backdrop, the team ensures smooth edges and natural details, even for complex objects like hair or fur.
Preserving memories is a delicate task that requires skill and patience. Photo Retouching India provides expert Old Photo Restoration Services to repair damaged, faded, or torn photographs. Their restoration specialists remove scratches, fix cracks, restore colors, and enhance clarity while maintaining the original character of the image. This service is ideal for families, archives, and photographers working with historical photos.
For complex image cutouts, Photo Retouching India offers professional Image Masking Services, including hair masking, alpha masking, and transparent object masking. These services ensure realistic edges for high-end photography and advertising needs.
In addition, their Clipping Path Services provide clean and accurate cutouts for eCommerce and product photography. All clipping paths are created manually to maintain precision and quality, making them suitable for catalogs, online stores, and marketing materials.
Great insights shared in this blog! For agencies in the USA looking to scale efficiently, white label web design and partnering with a reliable white label website developer are smart strategies. They allow agencies to deliver high-quality projects under their own brand while reducing overhead and maintaining flexibility. Spyce Media supports this approach by offering scalable, professional solutions that help agencies grow confidently while meeting client expectations and maintaining consistent quality.
ReplyDelete