Tuesday, August 28, 2012

Southern (California) Belle - Redesign

Hi all! Happy Tuesday. Hope your day is off to a good start. My week is looking up :]

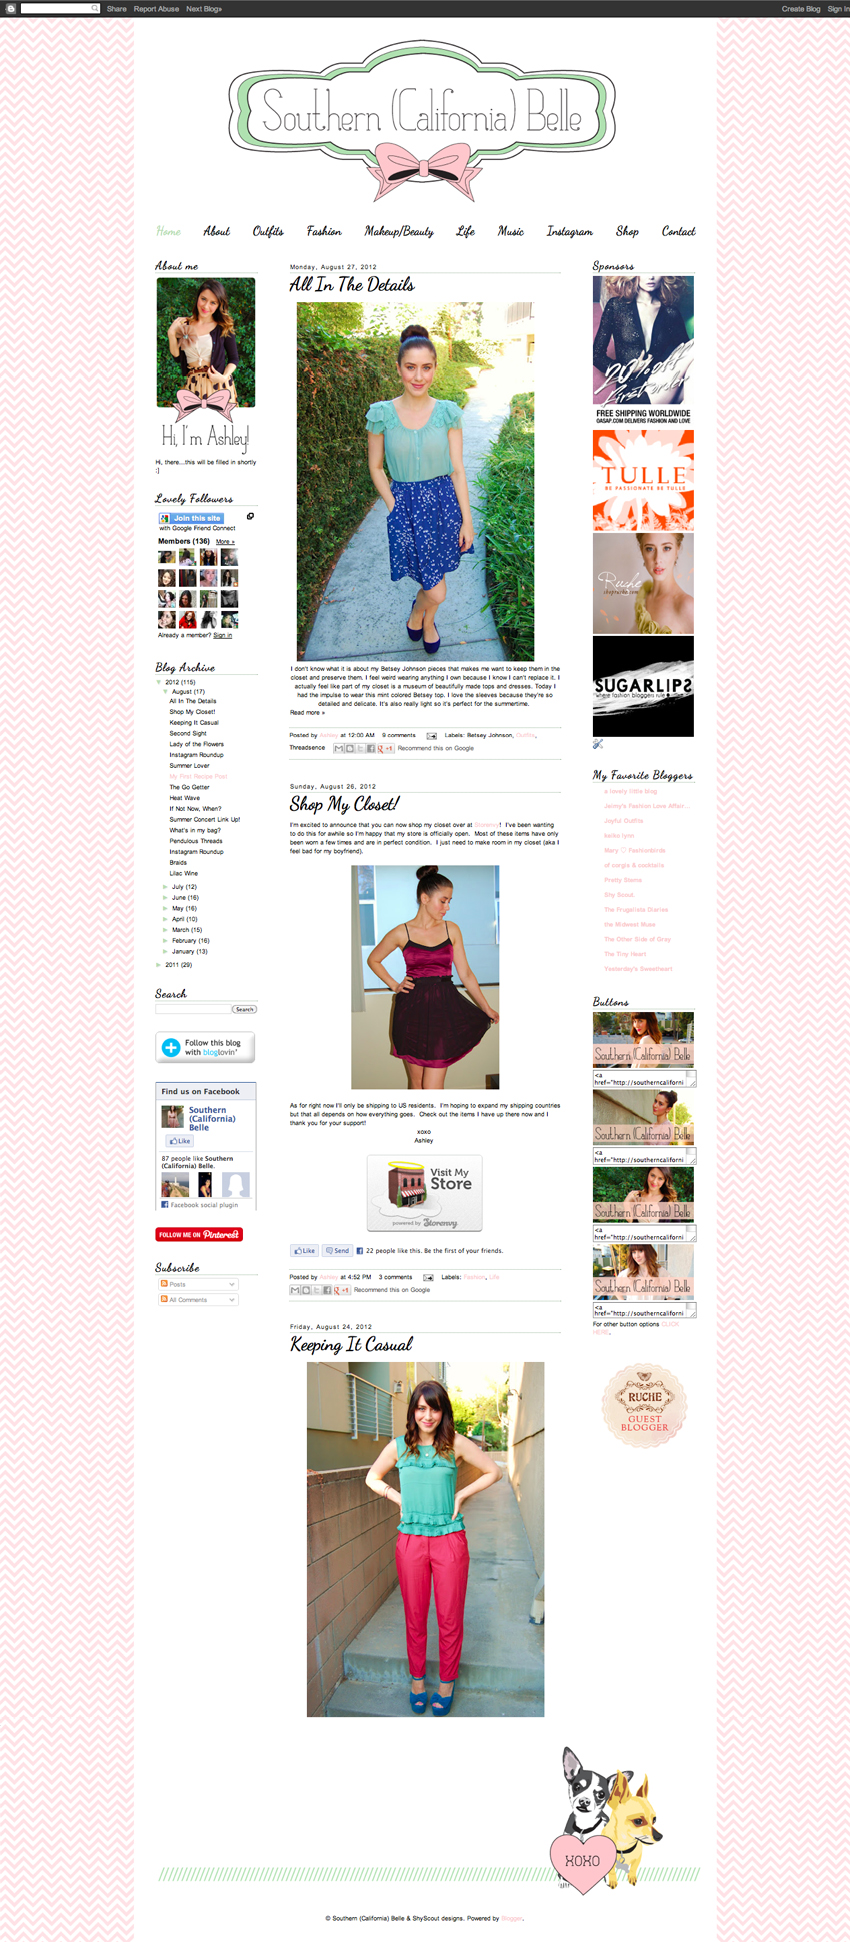
Today I want to share with you all my latest blog redesign for Ashley from Southern California Belle. She is a super cute lady with wicked style - if you haven't checked out her blog yet you most definitely should. She wanted a layout to reflect her personality and style, and well...here it is! :]

http://southerncaliforniabelle.blogspot.com/ redesign

I had a lot of fun (as always) working on this project. She wanted something classic, simple, and girly - three of my favorite things. I also made sure to include her two adorable pups as cartoons at the bottom.

I really need to set up a storefront for this already... In case you all are wondering - I adjusted my prices and am charging $100 for a blog redesign and I also sell bits and pieces of layouts a la carte. Feel free to email me at Shyscoutblog@gmail.com for more information! Also, you can click the image above to look at previous blog designs by me in case you are interested.

Also, as promised - the lucky winner (selected at random by rafflcopter) for the Positivum USA floral crown giveaway is...

a Rafflecopter giveaway
Ashley from a Southern California Belle ^^^. Pretty crazy, I know. Congrats Ashley! And thank you all for participating.

Have a good day everyone!

Tuesday, August 14, 2012

Latest Blog Design

Hi Lovelies!! Happy Tuesday. Hope your week is off to a good start. I was hoping to have a Toy Army Tuesday post for today butttt the rain has sort of messed up my photoshoot plans - definitely A-ok with that. I am super excited that it has been raining. Thank you for sending the rain clouds my way :]

I do have some fun news to share though!! Last Friday I completed one of my blogger besties - Roni, from Roni Feels Nostalgic's blog layout. (The layout below is a condensed version - you should definitely click on the image to visit her awesome blog and say hello!)

ronifeelsnostalgic

I had a lot of fun working on this retro layout. Roni compiled a great list of things she liked I took it from there. I really love the look of retro cartoons so I decided to create one of Roni as the header, I then created the rest of the layout from that :]

I still need to set up my blog design shop, ughhh. If you are interested in a design though shoot me an email at shyscoutblog@gmail.com. I would love to work with you and help beautify your blog. For more examples of my work click HERE.

On an unrelated note - tomorrow I am taking sweetpea to her first baseball game. Tehehe. It is bring your pooch to the park day and I am beyond excited. There will be prizes for the best puppy costume - I will have to take a bunch of photos. I have a feeling she is going to win. Haha. Have a good day everyone.

-------------------------------------------------------------------------------------------------------------------------

Have you entered the Positivum USA floral crown giveaway yet?!?!
If not click HERE to enter. You have until the 24th. Good Luck!!

-------------------------------------------------------------------------------------------------------------------------

Tuesday, June 19, 2012

Blog Design 101 - Bordered Background

Hi all! I haven't done a Blog Design 101 post in quite some time so I figured it was about time I rolled another one out. For todays post I plan to cover how to make a cute bordered background for your blog in Photoshop and how to then apply it to your blogger blog.
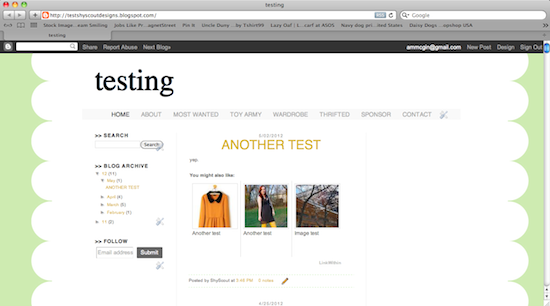
Untitled
(Look we are going for ^. However, please feel free to try out any other border you would like!)

**The steps below to create the background image may be followed by anyone, however, if you are using a blogging site other than blogger you will have to upload your image to an image hosting site and then use a tiled background code in your sites html.**

STEP 1
Open up Photoshop and create a document 1980x300 pixels at a resolution of 72 pixels per inch. I find that an image 1980 pixels wide or larger ensures that it fits on all computer screens. Having the image be 72 pixels per inch also helps keep the file size down and is all you need for online viewing.

Screen shot 2012-06-18 at 11.47.52 PM

STEP 2
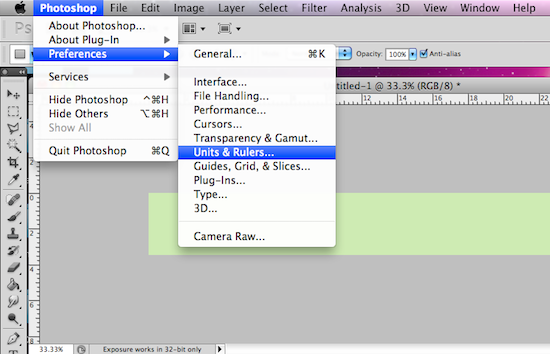
Fill the rectangle with whatever colored background you would like. I chose a mint green. Once you have filled the background please make sure that your rulers are set in pixels by selecting - Photoshop > Preferences > Units & Rulers > Pixels > OK.
Untitled Untitled

STEP 3
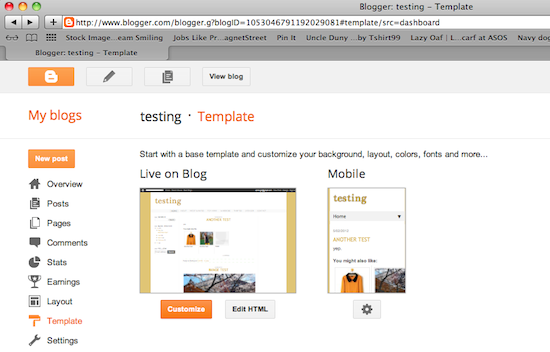
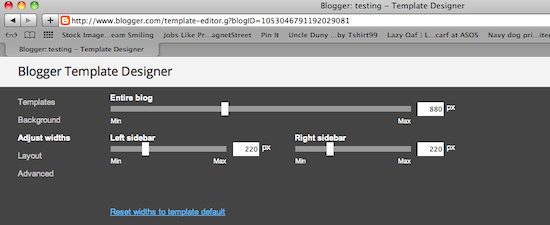
Next we need to figure out what the width of your blog is. If you do not know please go to your blogger homepage > Template > Customize > Adjust Widths > and view. My tester blog is set at 880 pixels so I want to make sure that whatever my inner background is it is at least that width or larger.
Untitled Untitled

STEP 4
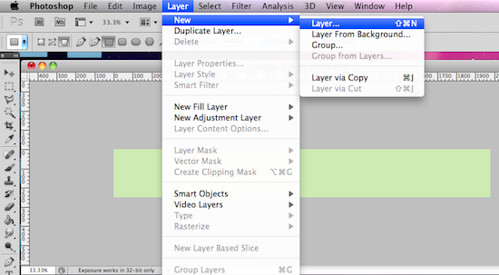
First create a new layer - Layer > New > Layer. In the new layer proceed to create a rectangle (this is the background for your text) larger than your blogs width (in this case my blogs width was 880 pixels ^). I chose to make mine a bit larger by making the inner background 1040 pixels wide. Once you have measured and created the rectangle center the box within the 1980 pixel space.
Untitled Untitled Untitled

STEP 5
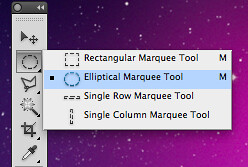
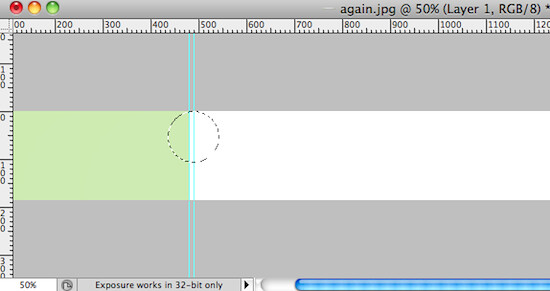
Once you have the inner background centered it is time to add the fun border. For this tutorial I added a scalloped edge. To do this first be sure to create a new layer. Once you have made a new layer create a circle with the elliptical marquee tool - be sure to hold down the shift key to ensure you create a perfect circle.
Screen shot 2012-06-19 at 12.15.39 AM
Screen shot 2012-06-19 at 12.16.38 AM

STEP 6
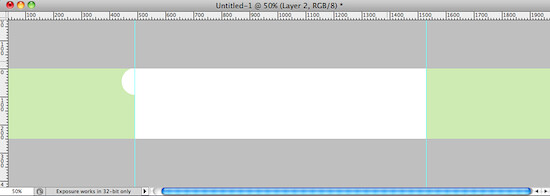
Fill in the circle with the color of your inner background. Once finished copy this filled in circle layer.
Untitled

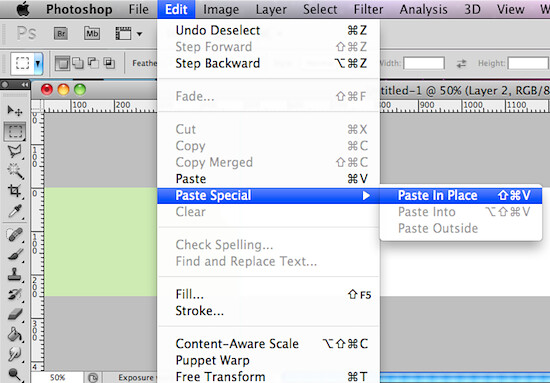
STEP 7 Once you have copied the circle layer proceed to paste the circle in place - Edit > Paste Special > Paste In Place. Drag the pasted circle below the other to create the scalloped edge. From here copy and paste in place the two circles and drag them to the opposite side of the inner background. Crop the image to the sides of the circles, or enlarge the circles to fit the space as shown below.
Untitled Untitled

STEP 8
We are in the home stretch! Save this file as a .jpg.

STEP 9
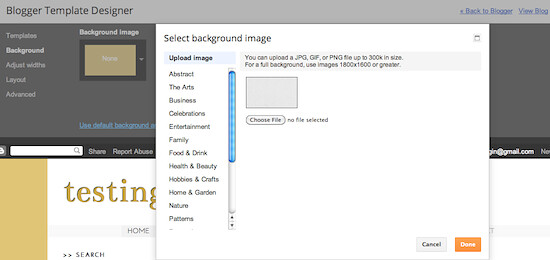
Now head back to the to the template page of your blog and re-enter the customize section. From there select Background > Upload image > Upload your newly designed background image.
Untitled

STEP 10
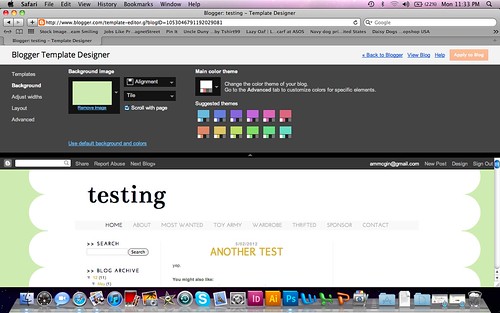
Once you have uploaded your image click on alignment next to your file. Select centered alignment and tile image - this will center and repeat your background.

Untitled Untitled

VIOLA!! You did it :] You may or may not have to play around with the image or the widths of your blog to ensure that it is perfect, but at least now you have the tools and are well on your way. Have fun!

-------------------------------------------------------------------------------------------

Teaching this stuff via the web is a lot more difficult and time consuming than I had anticipated. I never really think out the steps, I just do them. If this tutorial is difficult to follow, or if you have questions please let me know! Also, please let me know of any other blog design questions you would like answered and I will do my very best to answer them for you in an upcoming post :]

Have a great day everyone!!
Tuesday, May 8, 2012

Blog Design 101 - Resizing Images

Untitled

Hi all! This is the second installation of Blog Design 101 where I give mini design tutorials to help you spiffy up your blog. Last week we covered links - what they are and how to write them in different formats. This week I plan to give you a powerful and easy trick when it comes to resizing images.

TODAY I AM GOING TO COVER:
How to adjust the size of your images proportionally so that they can neatly align on your page.

When I asked for some design questions a few of you wanted to learn how to make images all the same width so that they align cleanly on your sidebar, posts, etc. Additionally, some asked to learn how to proportionally resize images - especially when it comes to buttons. Easy enough. Both go hand in hand!

To start out with
A basic image html tag is as follows:


-----------------------------------------------------------------------------------------------------------------------

TO RESIZE YOUR IMAGE
First you need to figure out what size the original photo is in pixels. You can do this by viewing the image in a photo editing program and looking at the photo's information (for example - mac users open in preview > tools> adjust size > pixels).

uploadme

Once you know the original size of the image you uploaded (^ the above image is 550x365), determine the size you want the image to be either in width or in height. For this example - I want the image to be resized to 300 pixels in width. I then use the program I opened the original photo in to adjust the proportions. Typing in 300 pixels wide should automatically resize the image to it's proportional height. If you are great at math - by all means do the calculations yourself - I just find doing this way easier for me.

Untitled

In this case it was a 54.5% image reduction making the height 199 pixels. Take the new size adjustments and simply paste them in to the following code.

uploadme

PROPORTIONAL IMAGE RESIZE:


EXAMPLE:


With this code you can now resize images so that they all are the same widths and align properly in your posts. This code is also extremely useful when you need to resize a button to fit the width of a friends sidebar and don't have the time to redesign a new one.

-----------------------------------------------------------------------------------------------------------------------

If you need further help or clarification please let me know and I will be happy to answer them in the comments section. Also - if you have any other design questions you would like answered in future posts please let me know. Have a great Tuesday everyone!!

Tuesday, May 1, 2012

Blog Design 101 - Links

Hi all! Hope you are enjoying the first day of May. Shyscout hit 200 followers last night!! *Doing the happy dance* Thank you so much for the support. I really love getting to know all of you and checking out your blogs. What an incredible way to start the month! I also thought it was only appropriate to kick start the month with a new feature on the blog – Blog design 101 – tutorials to help bloggers beautify their blogs. I will be breaking tutorials up in to two groups – html and graphics. Here goes nothing...

---------------------------------------------------------------------------

Last week I asked you to submit any design problems you would like solved. For my first set of tutorials I plan to answer your questions in the order they were submitted, therefore, today I am going to tell you a bit about html hyperlinks - aka - links.


Links are used all over the web to connect one webpage to another. Links use a word, phrase, or image to connect you to another document. Knowing how to properly write a link is beneficial to bloggers because it allows you to:

1. Connect your pages to previous posts.
2. Connect your content/images to their original source.
3. Allows you to connect a button to your page.

Thankfully links are one of the easiest and most straight forward codes out there.

LINK SYNTAX


EXAMPLE:


---------------------------------------------------------------------------

LINKING IMAGES
For linking images - such as creating a functional button for your blog - you simply insert the image code in place of the link's text.

EXAMPLE:


-----------------------------------------------------------------------------------------

ACTIVE LINK WITHIN BLOG POST
In order to create an active link within your blog's post simply place the link within your text.

EXAMPLE:


Depending on your blogs layout you may want to bold the link so that the link stands out within the text like so:

EXAMPLE:


-----------------------------------------------------------------------------------------

BLOG TAG LINKS
Last but not least - to create a link for specific blog tags simply use the following link

EXAMPLE:


*If your tag has multiple words place a %20 where the space would be.
For example: .../label/Wardrobe%20Wednesday

-----------------------------------------------------------------------------------------

I hope this was helpful to some of you. I realize we are all on different pages when it comes to blog design and coding. I was asked to explain this, so here it is. The tutorials will range in difficulty from here on out. Feel free to ask any design questions you would like answered in the comments below and I will cover them in a tutorial as soon as possible :]

Tuesday, April 24, 2012

Blog Design

I finished my first blog design for a client - my friend Erica at In the Light of Style.

In the Light of Style

If you haven't checked her blog out yet - you should! She has an incredible fashion blog and wanted a new layout to match her style. She wanted something clean, fashion-forward, and... bunnies! I had her compile an inspiration folder of colors, text, and images so I could visualize what she was going for and took it from there. The bunnies are her own illustrations! I simply made them vectors to fit the layout.

I really enjoyed working on this project. I learned quite a bit more in terms of html and I am excited to redesign my own blog shortly.

Visit - In the Light of Style

-----------------------------------------------------------------------------------

Need a new layout? I would love to design your blog!

I know I talked about it awhile back, but I would love to help other bloggers out by designing their blogs. I still haven't made a store front, but after working on the In the Light of Style blog I know that it is something I seriously want to do.

If you would like a blog redesign or bits and pieces designed feel free to shoot me an email at ammcgin@gmail.com for a quote.

-----------------------------------------------------------------------------------

Want to learn about blog design?

Please check out my last post. I am looking for questions you would like to see answered in blog design tutorials. I plan on starting them next month :]

Older Home
Related Posts Plugin for WordPress, Blogger...